It is thanks to a lot of hard work that has been performed the people at J2-Open Processor:
http://j-core.org/
In order to make use of it you will probably need to update your Mimas V2 programmer firmware to work at 115200 baud. This is so that the serial communications from the Linux core will work at a reasonable rate.
In order to achieve that you will need a micro-SD card capable of storing a small linux image. Get hold of a micro-sd card and then download vmlinux from the link below:
http://j-core.org/#vmlinux
Copy the file onto the micro-SD card. Do not try to write it as an image....its not like a raspberry Pi
( I may have made this mistake - thanks for the help Goran! )
Next you will need to update the programming firmware on your Mimas V2 to work at 115200 baud.
The firmware update increases the speed of communication between the PIC microcontroller and the FPGA device to 115200 Baud which is what is needed to upload programs from the arduino IDE.
You will need to download the following things in order to update the firmware:
Hex file to update baud rate to 115200
*Warning* There is currently no firmware to return the Mimas V2 PIC Microcontroller to it's original state and the updated firmware is currently beta only - it does have some issues. These are being addressed but at the moment there is currently no way to return the PIC on the Mimas V2 board to its factory settings.
I have not found any issues from doing this upgrade as yet however.
When my version of the Mimas V2 FPGA development arrived as new it did not have some header pins soldered into P3 - So I had to solder some in. This is needed to perform the PIC firmware upgrade:

Here is my board with the header pins soldered in:

Next you will need to short the pins together to put the PIC Microcontroller into firmware upgrade mode:

Connect up the Mimas V2 FPGA development board to your computer - it's time to update the PIC firmware! When you connect up the FPGA development board windows will install a generic USB driver for the PIC device - this is meant to happen.
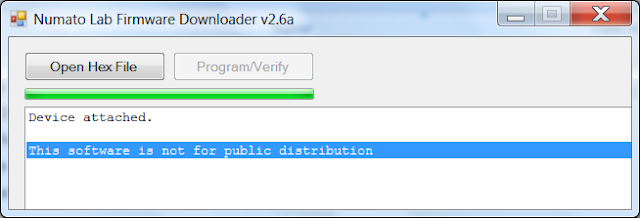
Open the folder where the software has been downloaded and execute up the firmware downloader program, Ignore the standard windows warning message - the program is fine. You should see something similar to the image below:
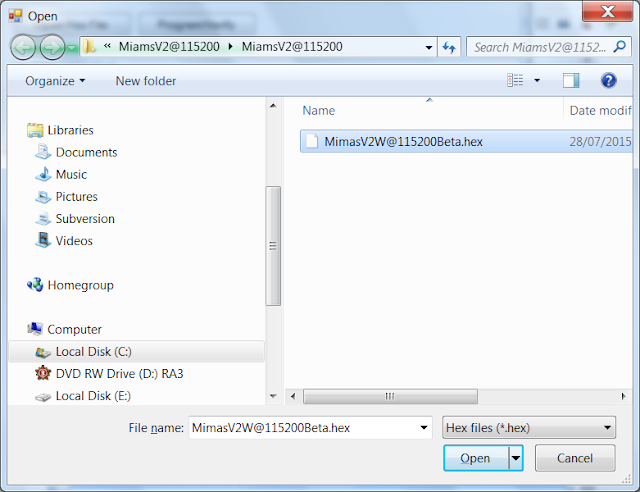
Click on 'Open Hex File' and navigate to where the 115200 baud update file was extracted - it's called MimasV2W@115200Beta.hex:
Click 'Open' to continue and then click on 'Program/Verify':
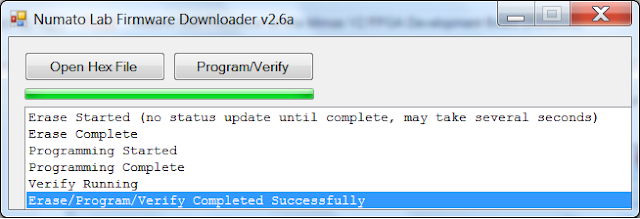
If all went according to plan you should see the above message!
*Warning* There is currently no firmware to return the Mimas V2 PIC Microcontroller to it's original state and the updated firmware is currently beta only - it does have some issues. These are being addressed but at the moment there is currently no way to return the PIC on the Mimas V2 board to its factory settings.
I have not found any issues from doing this upgrade as yet however.
When my version of the Mimas V2 FPGA development arrived as new it did not have some header pins soldered into P3 - So I had to solder some in. This is needed to perform the PIC firmware upgrade:

Mimas V2 FPGA Development board without Firmware Upgrade Header
Here is my board with the header pins soldered in:

Next you will need to short the pins together to put the PIC Microcontroller into firmware upgrade mode:

Connect up the Mimas V2 FPGA development board to your computer - it's time to update the PIC firmware! When you connect up the FPGA development board windows will install a generic USB driver for the PIC device - this is meant to happen.
Open the folder where the software has been downloaded and execute up the firmware downloader program, Ignore the standard windows warning message - the program is fine. You should see something similar to the image below:

Click on 'Open Hex File' and navigate to where the 115200 baud update file was extracted - it's called MimasV2W@115200Beta.hex:

Click 'Open' to continue and then click on 'Program/Verify':

If all went according to plan you should see the above message!
Once that has been done you can remove the programming link. Now it's time to upload the bin file to the FPGA which will create a soft processor which then accesses the micro-SD card and runs a version of Linux.
Now we need to download the file below - it's the bin file for the FPGA which runs at 115200 baud and adds the soft processor to the FPGA etc
Now upload it to the FPGA using the appropriate program - I don't use linux and so I use the MimasV2Config.exe program in Windows. If you are using Linux then there are python scripts available.

Select the COM port associated with your Mimas V2 FPGA Development board - mine was COM 22:

Then click on 'Open File' and navigate to where the mimas_v2_115200.bin file is located:

Then Click program!

Once it has completed. The FPGA will reboot and the seven segment display will go through a process. At the end of the process it should look the like the picture below:

Next it is time to check all is working. Move the programming direct switch SW7 over to the right - towards the VGA connector. Then load up the serial terminal program of choice. In my case I use RealTerm but in theory any serial terminal software 'should' work:
It is important to set the display to ANSI so ensure that spurious characters are not displayed. In realTerm:

Then click on the port tab and set it to reflect the settings for the serial port on the Mimas:

Then when you are connected it should be possible to reboot the board by manipulating SW7:

Once it has completely booted the command line prompt should be displayed:
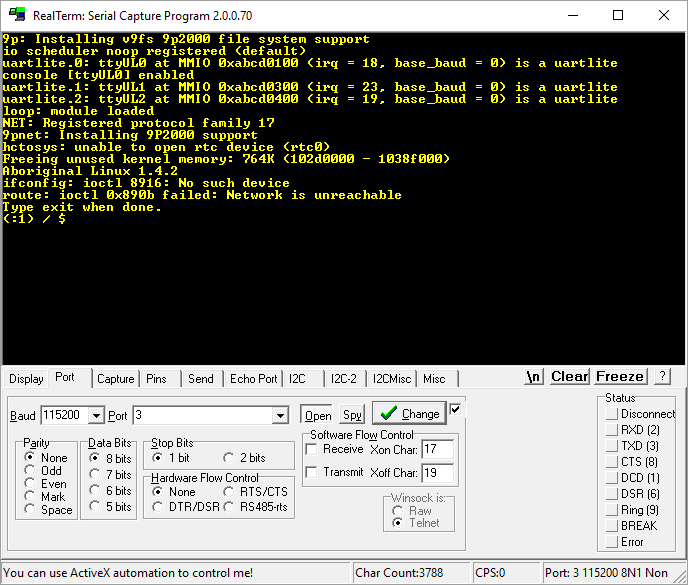
Type some commands in and check all is working! I tried LS and DMESG etc. All seemed to respond correctly. I should be honest here and explain that my Linux skills are not as strong as they could be. I use it when necessary. I have only so much time and brain space available these days. When I have to learn something I do...I haven't 'had' to learn Linux command line stuff much yet!

I think to properly make use of this the Mimas V2 needs an Ethernet port. Something I was thinking of designing although I may try and cobble something together from a breakout module. There are lots available to try.
That's all for now - take care - Langster!
No comments :
Post a Comment