I recently donated my bench top power supply to my local Hackspace - HACMan at Madlab!....As usual I then needed it to do some prototyping work. One thing every budding electronics engineer or hardware hacker needs is a good power supply. Rather than trek to the Hackspace to get mine back I'm going to design and build another!
There are many tutorials out there for building a power supply but seeing as I need one I thought I would write my own after having to go through it for myself.
There are some design considerations to choose before making a power supply:
- Type - Linear or Switch-mode
- Variable voltage or fixed
- Variable current or fixed
- Over current protection
- Short Circuit protection
Most of these things are dependent on the type of regulation that is chosen. I have decided to use a linear supply in my case. These are power supplies which use a linear transformer - a device used to convert the ac mains voltage from 230V UK Mains voltage down to a more useful and safer low voltage. In this case I would like a supply that has variable voltage and current control from around 3V up to 30V with at least 1A current. I also will need a way of displaying what the actual voltage and current setting is so we will be adding some panel meters.
How do these things work? Electricity comes out of the UK mains socket as 230V r.m.s. alternating current or ac at 50Hz. What exactly does that mean?? Well it means that the electricity has a maximum electrical pushing force of 230V and that the polarity changes direction every 10ms or 25Hz. For definitions on basic electrical theory and general physics here is an excellent website:
It covers everything in a lot more detail than I intend to go through in this post. So back to the subject.....
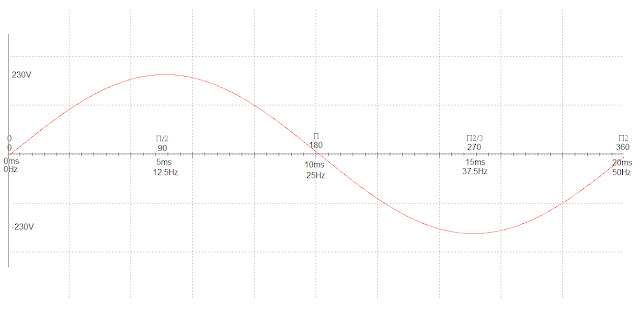
For those who don't know electricity is generated by rotating a permanent magnet in a coil of wire. The magnet turns in a circular motion. The more the magnet moves the more electricity is generated. The speed of the magnet turning is directly related to the frequency of the current. Every time the north and south of the magnet are reversed the current changes polarity. The circular motion causes the output to be sinusoidal and if we were to plot a graph of the output it would look like the picture below:
I have put several scales on the x axis so that it can be seen that the voltage changes polarity with respect to time and therefore frequency. Frequency is the inverse of time or frequency (Hz) = 1 / time (seconds). I also put degrees and radians on the graph as the change in polarity can also be related to angular motion (the magnet rotating in the coil). This is known as alternating current and it is the type of waveform that would be seen if you were to take an oscilloscope and measure the output of a mains outlook socket. (I don't recommend doing this unless you have a suitable high voltage ac scope probe!!!)
The ac waveform that comes out of the sockets will be 'stepped down' or transformed into a smaller voltage using a linear transformer. A linear transformed is an electronic component with the symbol shown below:
It is really two inductive coils placed next to each other with a laminated iron core running through each ring. For a step down transformer the first inductive coil known as the primary will have more turns than the second coil or secondary. The difference between the coils is known as the turns ratio and this can be used to calculate how much the voltage will be 'stepped down'. The formula - helpfully known as the turns ratio is as follows:
Np : Ns = Vp : Vs
Np = Number of turns on primary coil
Ns = Number of turns on secondary coil
Vp = Voltage at primary coil
Vs = Voltage at secondary coil
So lets use the formula to calculate the turns ratio of the transformer that I need for my 3-30V transformer. We know that the mains voltage is 230V and we know that we want at least greater than 30V at the output. To make things easy lets say 32V. Lets plug those values into the formula:
Np : Ns = 230V : 32V
Set Ns = 1 and therefore
Np = 230V / 32V
If we then calculate the ratio we find that:
230/32 = 7.1875
So from this we find that we need a transformer with a turns ratio 7:1. This will 'transform' the mains voltage from 230Vac to 32Vac.
If we were to draw a schematic diagram of what we have done so far it would look like this:
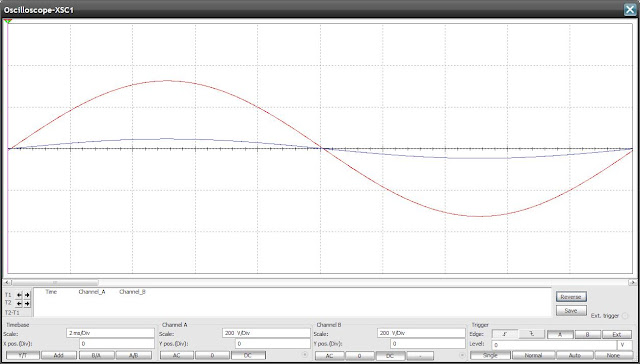
If we were to attach an oscilloscope to the circuit and measure the input and output we would see the waveforms below:
Note: The Y scale or volts / division setting on the oscilloscope is the same for both graph traces (200V/div). The red trace is the mains input or Vp and the blue trace is the 'stepped down' output or Vs.
Now that we have the voltage at a more manageable and safer lower level we need to convert it from alternating current (ac) to direct current (dc). There are several methods of doing this and most of them involve using semiconductor rectification or diodes.
The diode is an electronic component which acts like a kind of electrical gate. It only allows electrical current to flow through it in one direction. They are made up of something called a PN junction. What is a PN junction? Well this can get complicated but in its most basic form a diode or PN junction is a two pieces of silicon (or germanium) sandwiched together. Before the two pieces of silicon were joined together they were treated in a special way in order to make one side more positive (P-type material) and one side more negative (N-type material). The process is known as 'doping' and to make the semiconductor more positive the molecular structure of the silicon has had electrons removed to create 'holes'. The N-type semiconductor material does not need anything added to it to make it more negative. The silicon already has electrons present which make it negative.
The anode is the positive terminal and the cathode is the negative terminal. We are going to use diodes to turn the ac output of the transformer secondary into direct current (dc). The diodes will stop the current alternating and going negative. It should be noted that diodes will only do this once they have 0.7V present at the anode. It also means that our output circuit will lose 0.7V every time we add a diode. In the circuit below a diode has been added to one of the transformer secondary outputs. The resistor is purely a load for the electronic circuit (spice) simulator.
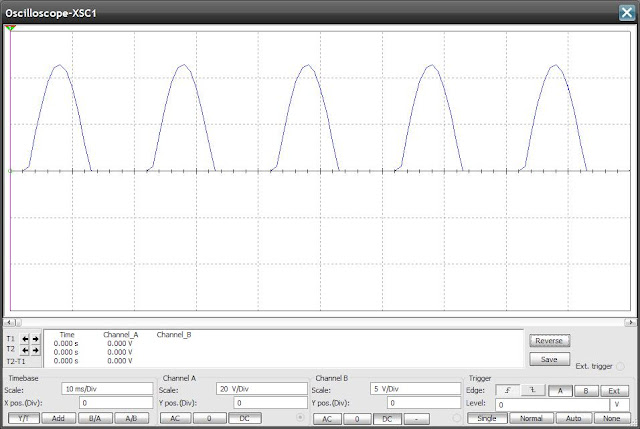
The oscilloscope output looks like this:
The output is now always positive in the positive portion of the sine wave or positive half cycle. The negative half cycle is not present. This is known as half-wave rectification Adding more diodes to the circuit causes the negative portion of the sine wave to be rectified. This is known as full-wave rectification. To get full wave rectification for our circuit we will need to make what is called a diode bridge or bridge rectifier. It is possible to buy bridge rectifiers as single parts but we are going to make one from four separate diodes:
The oscilloscope output will now look like this:
As can now be seen all of the output from the transformer is now positive. If we were making a rugged battery charging circuit or we needed a dc current supply for welding we could use a circuit similar to this. For most electronic applications the output will need to be smoother and more like the output of a battery.
Well....That's all for now folks. The next post will go through smoothing and regulation! The final post will go through realising the circuit and actually building the power supply. Have fun as much as possible but be careful!!!


No comments :
Post a Comment