Here is the original post on pressure sensors:
http://langster1980.blogspot.co.uk/2014/11/how-to-use-pressure-sensor-with.html
This is not too difficult but you will need a few items:
- An air pump - a bicycle pump will do.
- An air pressure gauge - something with a human readable scale, preferably calibrated...
- An MPS20N0040D-D pressure sensor and the difference amplifier set to the gain required for the circuit in mind - Hint I sell breakout boards here - Buy a pressure sensor breakout board
- An arduino uno or other suitable microcontroller development board.

Connection Diagram
Once you have everything connected as above upload the code below into the arduino:
/*
Pressure Sensor test Code
*/
const int analogInPin = A0; // Sensor connected to A0
int sensorValue = 0; // value read from the pressure sensor via the amplifier stage
float outputValue = 0; // value output to the Serial port
void setup() {
// initialize serial communications at 9600 bps:
Serial.begin(9600);
}
void loop() {
// read the analog in value:
sensorValue = analogRead(analogInPin);
// print the results to the serial monitor:
Serial.print("sensor = " );
Serial.print(sensorValue);
Serial.println();
delay(1000);
}
Now open the serial monitor in the arduino IDE. Observe the bit value received when no pressure is applied to the sensor. This is the zero value. Now introduce air pressure to the sensor using the pump. When the external gauge reads 1 psi record the value of bits received. Repeat this process until you have reached 32 psi or when 1023 bits has been recorded. Create a table of results, mine looked like this:
Input pressure
|
ADC
|
ADC voltage
|
(PSI)
|
(Bits)
|
(volts)
|
0
|
61
|
0.283295132
|
1
|
82
|
0.4001820137
|
2
|
96
|
0.4740954967
|
3
|
116
|
0.5620723363
|
4
|
141
|
0.6742689746
|
5
|
163
|
0.7817888563
|
6
|
191
|
0.9386412512
|
7
|
242
|
1.183020528
|
8
|
269
|
1.329648094
|
9
|
329
|
1.632903226
|
10
|
420
|
2.052785924
|
11
|
450
|
2.19941349
|
12
|
470
|
2.2971652
|
13
|
510
|
2.492668622
|
14
|
540
|
2.639296188
|
15
|
570
|
2.785923754
|
16
|
605
|
2.956989247
|
17
|
630
|
3.079178886
|
18
|
660
|
3.225806452
|
19
|
690
|
3.372434018
|
20
|
720
|
3.519061584
|
21
|
740
|
3.616813294
|
22
|
765
|
3.739002933
|
23
|
800
|
3.910068426
|
24
|
850
|
4.154447703
|
25
|
900
|
4.398826979
|
26
|
920
|
4.49657869
|
27
|
950
|
4.643206256
|
28
|
969
|
4.736070381
|
29
|
980
|
4.789833822
|
30
|
995
|
4.863147605
|
31
|
1000
|
4.887585533
|
32
|
1006
|
4.916911046
|
Now that the results have been obtained we can plot a graph which shows how the number of bits received relate to the amount of pressure present. We could work this out from the table but it's much easier to visualise this using a graph:
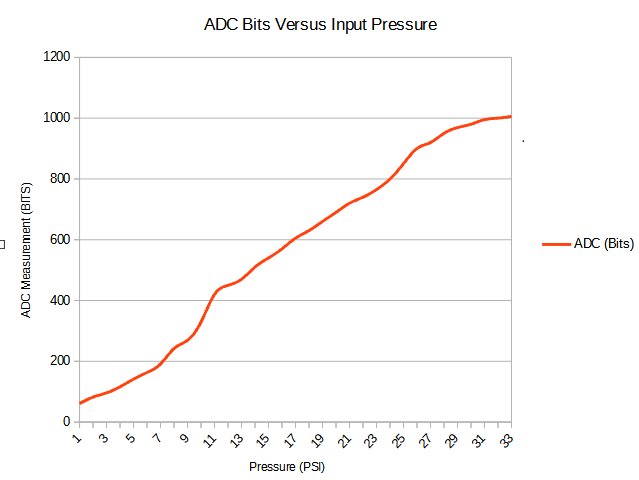
We can use the information from the graph and the table to display the pressure measured in psi. There are several methods to achieve this such as a lookup table which will interpolate the results. I have decided to use a map function as the results obtained a quite linear (a straight line was achieved).
Arduino Map Function
Enter the highest value obtained and the lowest value obtained and apply it to the scale needed (in this case PSI) and the function will do the rest for us:
outputValue = map(sensorValue, 60, 1006, 0, 32);
Here is the full code in case people need it:
/*
Pressure Sensor test Code
*/
const int analogInPin = A0; // Sensor connected to A0
int sensorValue = 0; // value read from the pressure sensor via the amplifier stage
float outputValue = 0; // value output to the Serial port
void setup() {
// initialize serial communications at 9600 bps:
Serial.begin(9600);
}
void loop() {
// read the analog in value:
sensorValue = analogRead(analogInPin);
// print the results to the serial monitor:
Serial.print("sensor = " );
Serial.print(sensorValue);
outputValue = map(sensorValue, 60, 1006, 0, 32); // convert the raw bit value
Serial.print("sensor = " );
Serial.print(outputValue);
Serial.println();
delay(1000);
}
Hope this helps people make more use of the MPS20N0040D-D pressure sensor.

Can this sensor be used to quantify negative pressures?
ReplyDeleteNo. It's not an absolute sensor. You could try the md ps002
DeleteActually, yes, you can! If you put the SENSOR ITSELF where you want to measure the negative pressure, and route its input nozzle out into to the atmosphere.
DeleteI have noticed that small levels of negative pressure (vacuum) can be detected with this sensor. I have never tested it formally so I wouldn't rely on it's accuracy without testing it. The datasheet for the sensor makes no mention of the sensor's ability to measure vacuum. I'd be more inclined to choose a sensor that was rated for measuring vacuum such as a pirani or penning gauge.
ReplyDeleteHi
ReplyDeletePlease tell me with what elements can I make a blood pressure monitor?
Hi thanks for commenting.
Delete1. A blood pressure cuff
2. A pressure sensor similar to the MPS20N0040D-D
3. An open and close valve - electronic or mechanical.
4. A small air pump - electrical or manual
5. Tubing to connect pump, valve and blood pressure cuff together.
6. A microcontroller similar to an arduino capable or measuring analogue signals
7. An electronic sound sensor like a piezo sensor or an electret microphone.
8. A power supply or battery capable of powering the system.
9. Connecting wires and a breadboard to assist in the prototyping.
10. An LCD display to show the results of the measurement.
I think that is everything - good luck!
Thank you very much for your reply
ReplyDeleteI have to make a blood pressure monitor
If I have a problem, can I get help from you?
I will always try and help where I can. It is a little difficult for me at the moment as I don't have any pressure sensors or access to my equipment and tools.
DeleteInstead of using a regular cuff and a pump, can I use a digital cuff when connected to a blood pressure sensor and Arduino?
DeleteThank you for helping me
I would need to understand how the digital cuff works before I can pass comment on that. Send me the details of the digital cuff.
DeleteHey Alex,
DeleteCan you communicate with this unknown man?
I have to do bpm also
I need help
i can't understand, sensor has a range of 0 to 5.8 psi, how you can measure 32 psi?
ReplyDelete
DeleteThe datasheet for the pressure sensor is badly written in English. I suspect the taiwanese version is more clear. I cannot read or speak Taiwanese so I was in dark...
That said when I performed this test I tried not to have any preconceptions. I introduced positive pressure and measured the output from the sensor. When an increase in pressure was no longer registered I took it to mean the sensor had reached the end of it's measurement range. The figure I got was 32 PSI...So ignoring what was stated by the poorly translated datasheet I found this sensor could measure from 0 PSI to 32 PSI for the particular sensor used. Other sensors may vary and other results may vary.
I hope this helps - thank you for reading and commenting on my blog
Thanks for the reply man, I'm an electrical engineering student and I'm on a project using a pressure sensor, the "xgzp040db1r" was purchased, but from what I saw, the specifications are the same. Searching the Internet, I ended up getting here, using your code as a basis for testing and it was working.
DeleteIn the project I need to use an air bulb, I made an adaptation with a pen to connect to the sensor and everything was going well, but when I released the bulb it inflated again, equalizing the pressure.
So I ended up sealing the nozzle of the sensor and, when I went to test, the sensor stopped responding, I believe that it did not support the pressure because it is completely sealed. I don't want to spoil the other one I own, because due to the quarantine things take time to arrive ... Can you tell me if this type of sensor always needs to match the pressure? I need to keep a constant pressure reading, but as I stop pressing the buldo it will inflate again and the pressure is equalized, what can I do?
Hi, What you are measuring is the increase in pressure when you squeeze your 'bulb'...It sounds like you don't have a check valve in in your pneumatic system between the 'bulb' and the reservoir you are trying to inflate. I don't know the size of the tubing you are using but you can by simple check valves for aquarium pumps and fish tanks like this one:
Deletehttps://www.ebay.co.uk/i/112777039387
When you inflate your system none of the air pressure can now return to the bulb and you can perform your measurements. Once finished you can unscrew the valve release to let the air pressure drop. Good luck!
Hey, i am trying to run your code but its giving constant output 78
ReplyDeletehey I want details on how to use Pressure sensor air pressure sensor module water level sensor module 0-40kp
ReplyDeleteCan you please help me?
I want to measure the water level inside a plastic bottle.
Hello i would like to use this sensor on a gamepad usb controller. I would like to disassembly one of the joystick wheel and add it. Do you think it will work? How to connect it?
ReplyDeleteThank you very much! Neat, detailed work!
ReplyDeleteSeems your link to the graph is stale.
ReplyDeleteUpdated - thanks for letting me know.
DeleteAwesome! Thanks for sharing such a useful tips with us. If you want to know more about Pisco Pressure Sensors so you should visit us.<
ReplyDeletewater pump for sale trinidad
ReplyDelete